Once the event is created, event info tabs are generated depending on your chosen Application Type. Below, you will find the description of all Event Tabs.
Details Tab
The Details tab is the main tab of the event profile and is always displayed for all events, regardless of the selected Application type. The details tab displays all the details and entry fields listed while creating a New Event, and they can be edited by Event Admins at any point.
Managers Tab
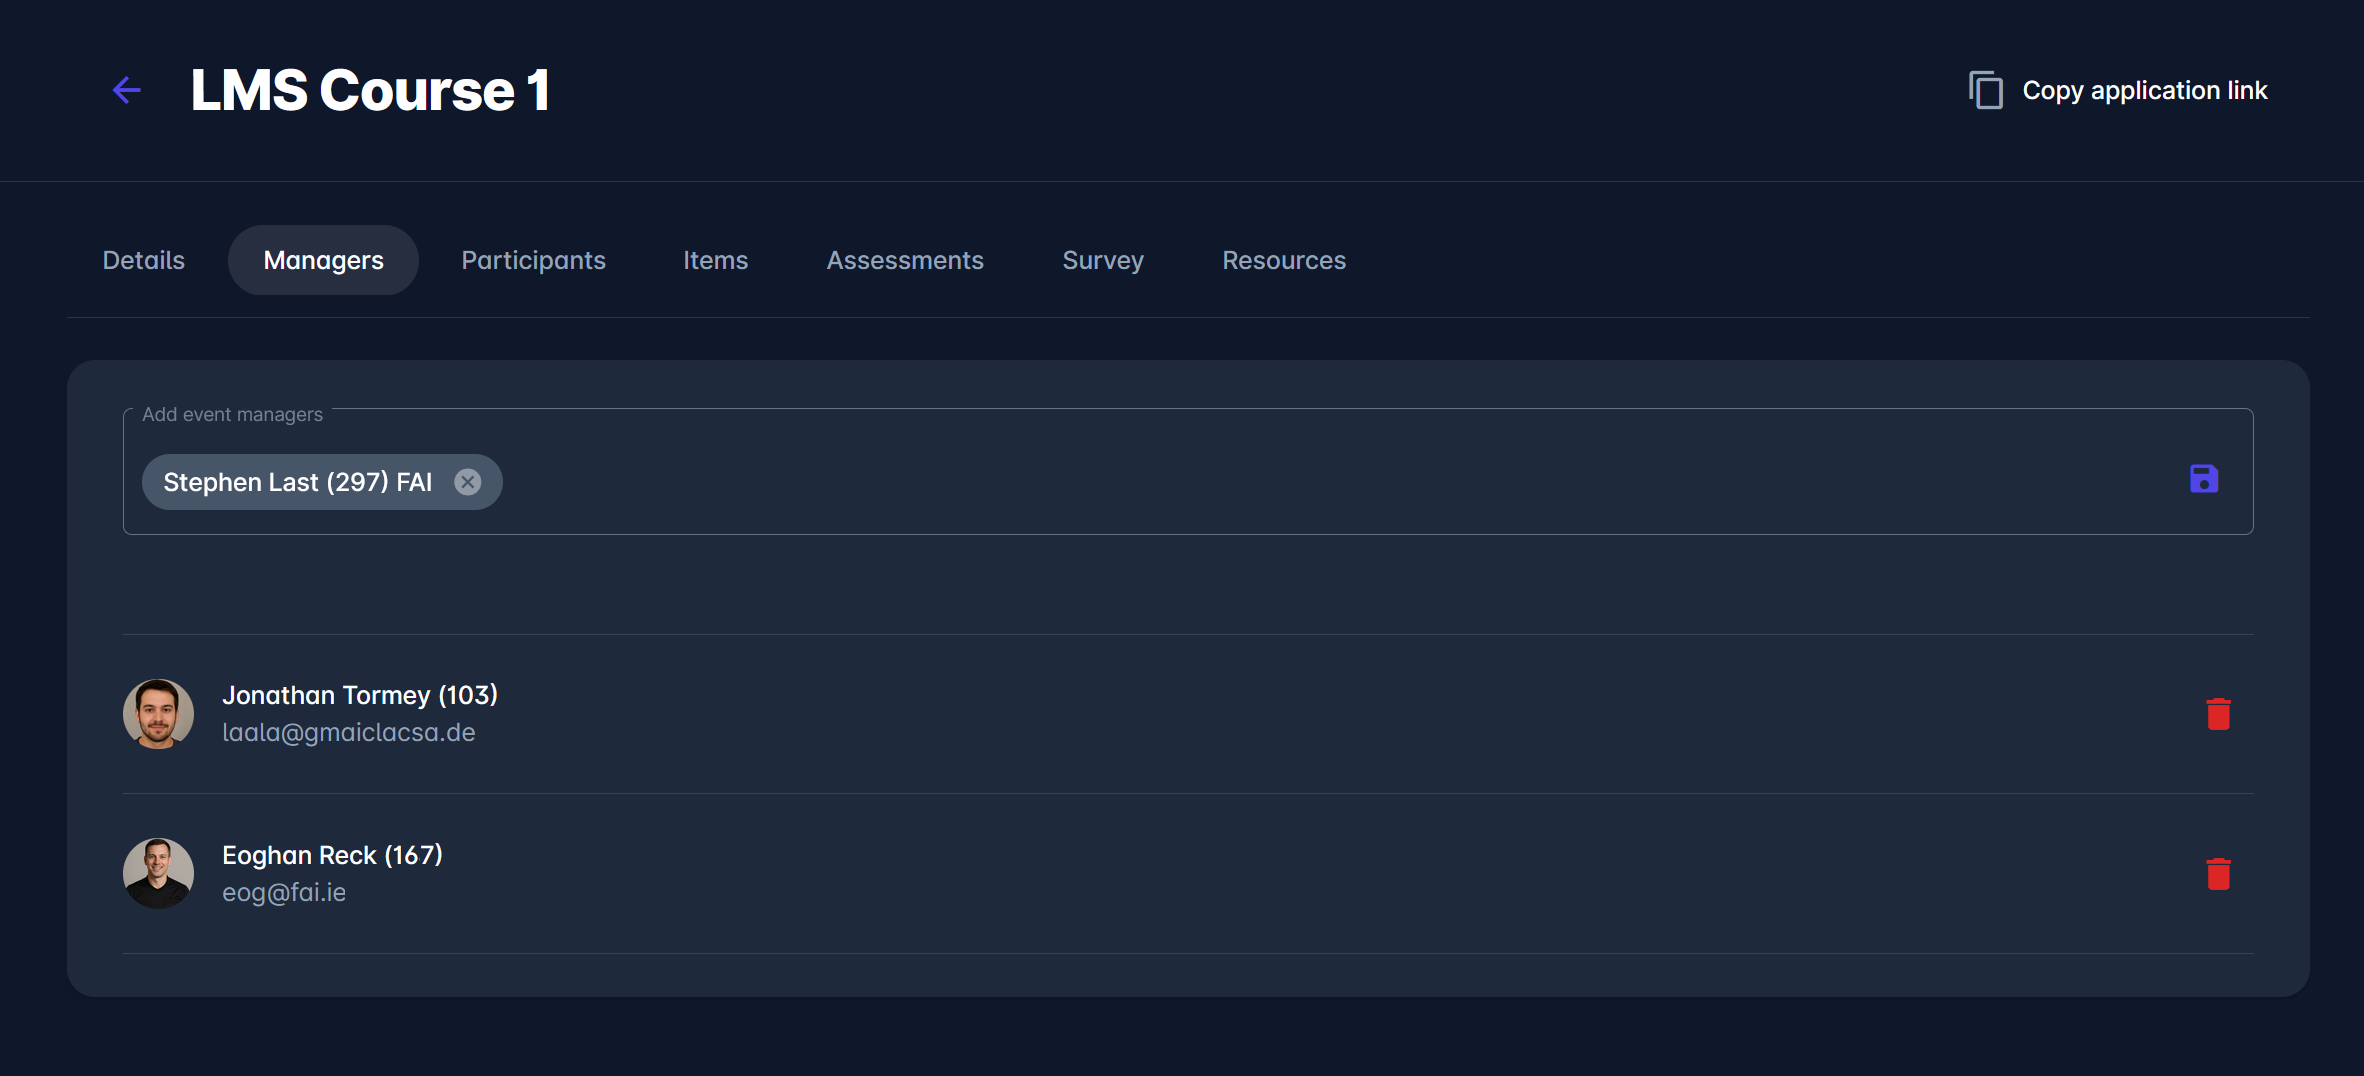
The Managers tab is displayed on all events regardless of the selected Application type. It shows the list of all event managers assigned to the event. Assigned Event Managers can then perform administrative tasks on the event, such as managing participant statuses.
To add a new Event Manager:
-
Access the Managers Tab
-
Reach the Add event managers search box
-
Select the Event Manager from the list
-
Hit the 💾 Save Icon button to assign the user as the manager
To delete/unassign the Event Manager from the Event:
-
Access the Managers Tab
-
Reach the User that you want to delete
-
Hit the Bin Icon button to delete the manager
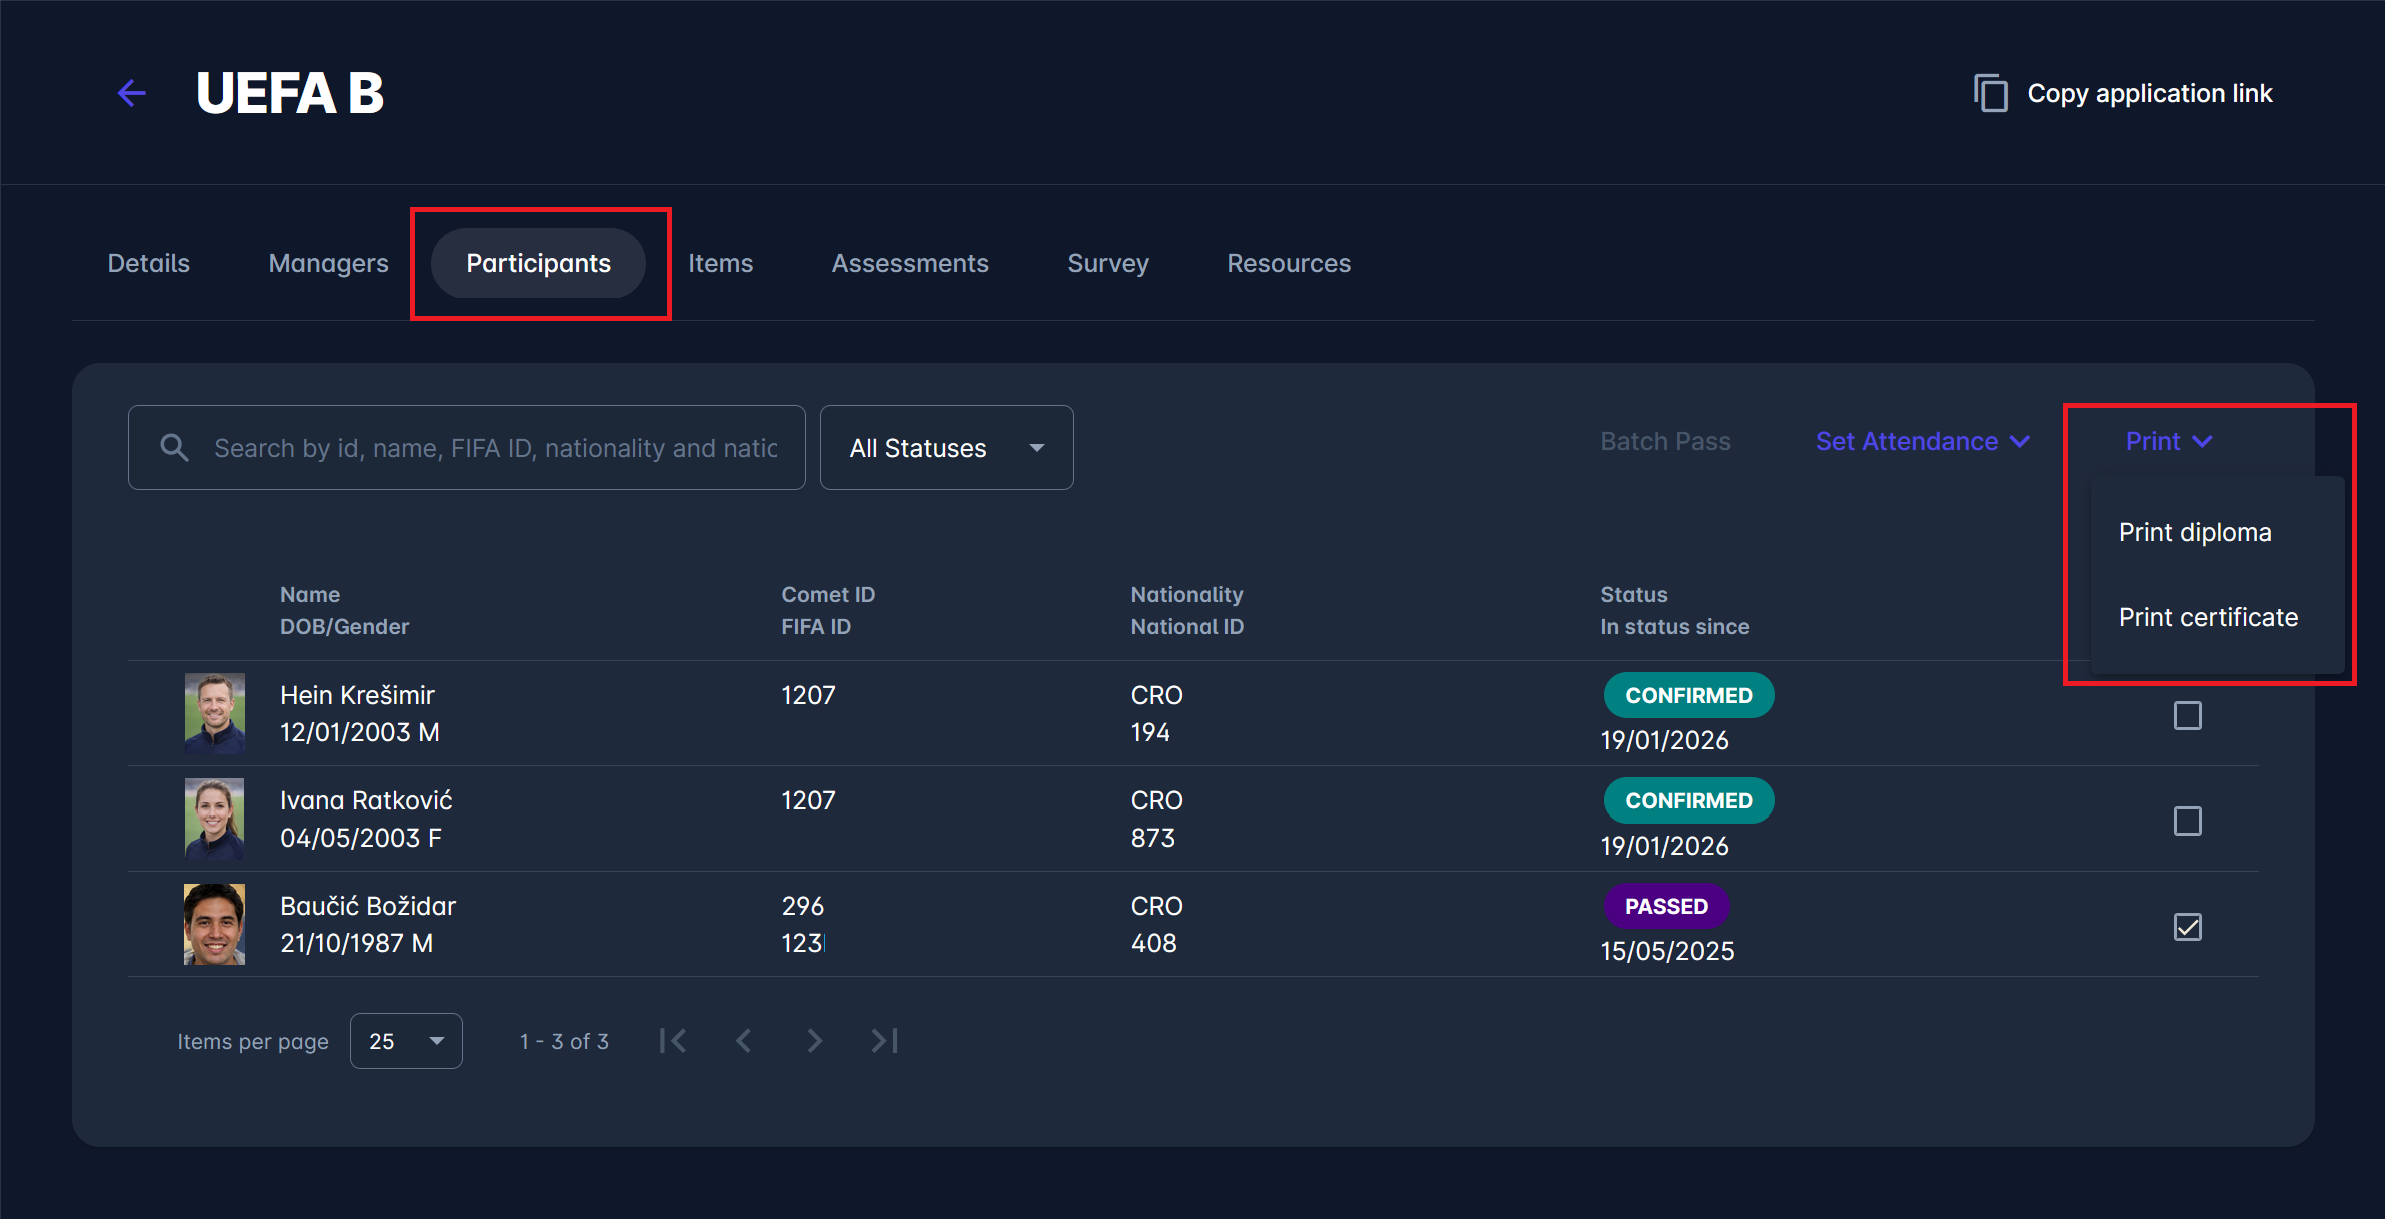
Participants Tab
The Participants tab is displayed on all events regardless of the selected Application type. The participants tab displays a list of all participants, i.e., all event applicants, with their application status indicated. The list consists of the following details:
-
COMET ID
-
Name
-
Date of birth
-
Status (application status)
-
In status since
-
Attended - this data column is displayed in case the Track Attendance Feature is enabled
-
The search box - use the search box to search for participants who applied to the event; you can click on the participant from the list to open a Participant Profile
Diploma and Certificate Print
From this tab Event Admin can print:
-
Diplomas - for participants in status PASSED
-
Certificates of attendance (if track attendance feature is enabled on the event) - for participants in status ATTENDED
To print Diploma/Certificate of Attendance;
-
Check a box next to the participant’s name/choose the select all button
-
Hit the Print button
-
Select Print diploma/Print certificate from the dropdown
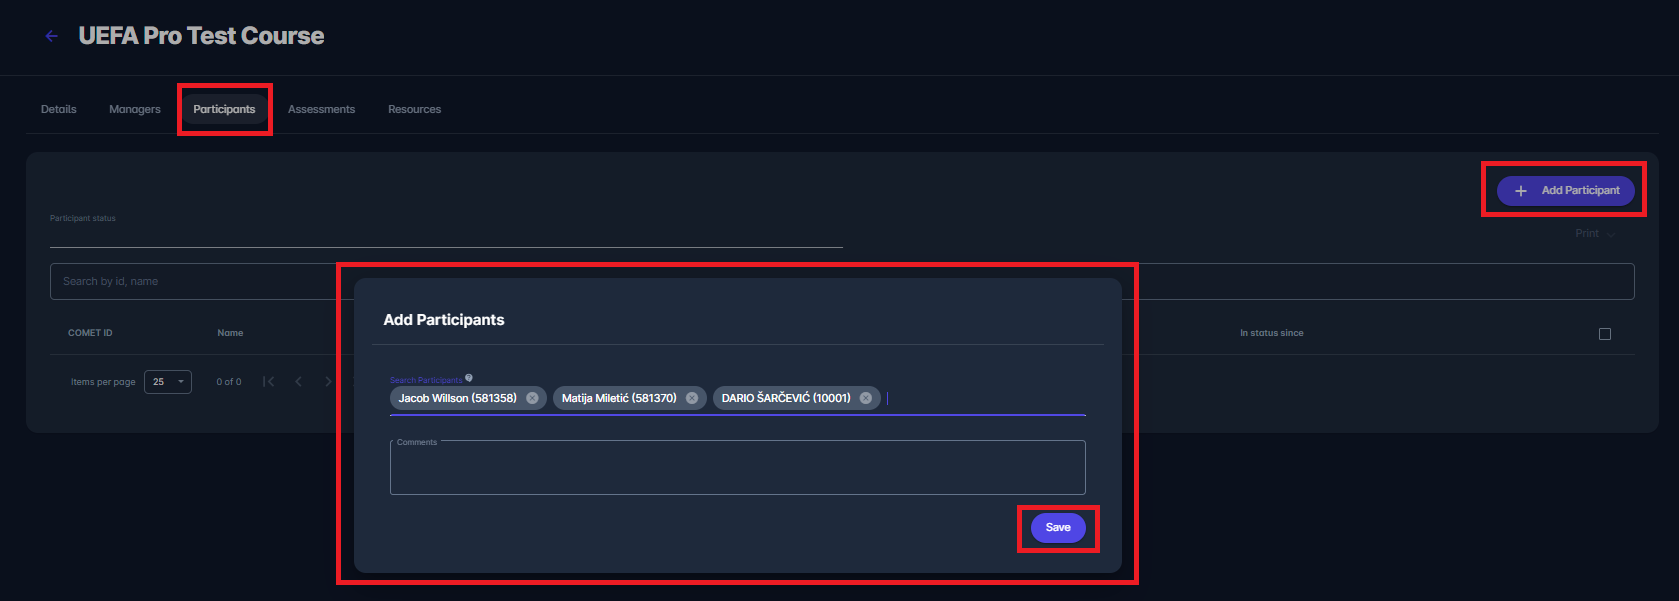
Adding the participants manually
If your chosen application type is Event Application Types | Manual, the event requires you to add the participants manually.
To complete this action, click on the Add Participant button on the top right of your screen. A pop-up window will appear, prompting you to search for the persons you want to add as participants. You can add more than one participant to a single take by entering their names.
After completing this action, don’t forget to click on the Save button.
Please note that the system requires you to write at least three characters from a person's name to start the search.
Also, the Manual application type allows you to remove the person from the participants list. To achieve that, click on the person on the list of participants. This action will open a new window with the participant information related to this event.
To delete the participant, click the Bin icon at the top right of your screen, then confirm your action by clicking the ✔️ Check mark in the pop-up window.
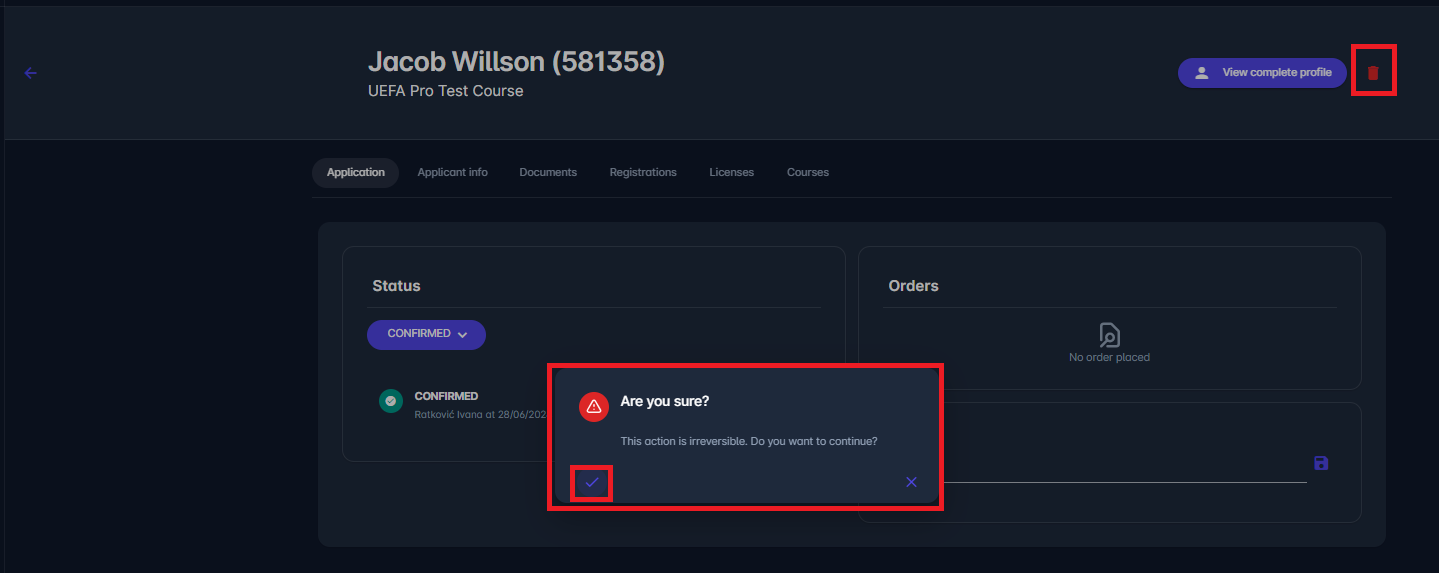
Please note that this action is irreversible!
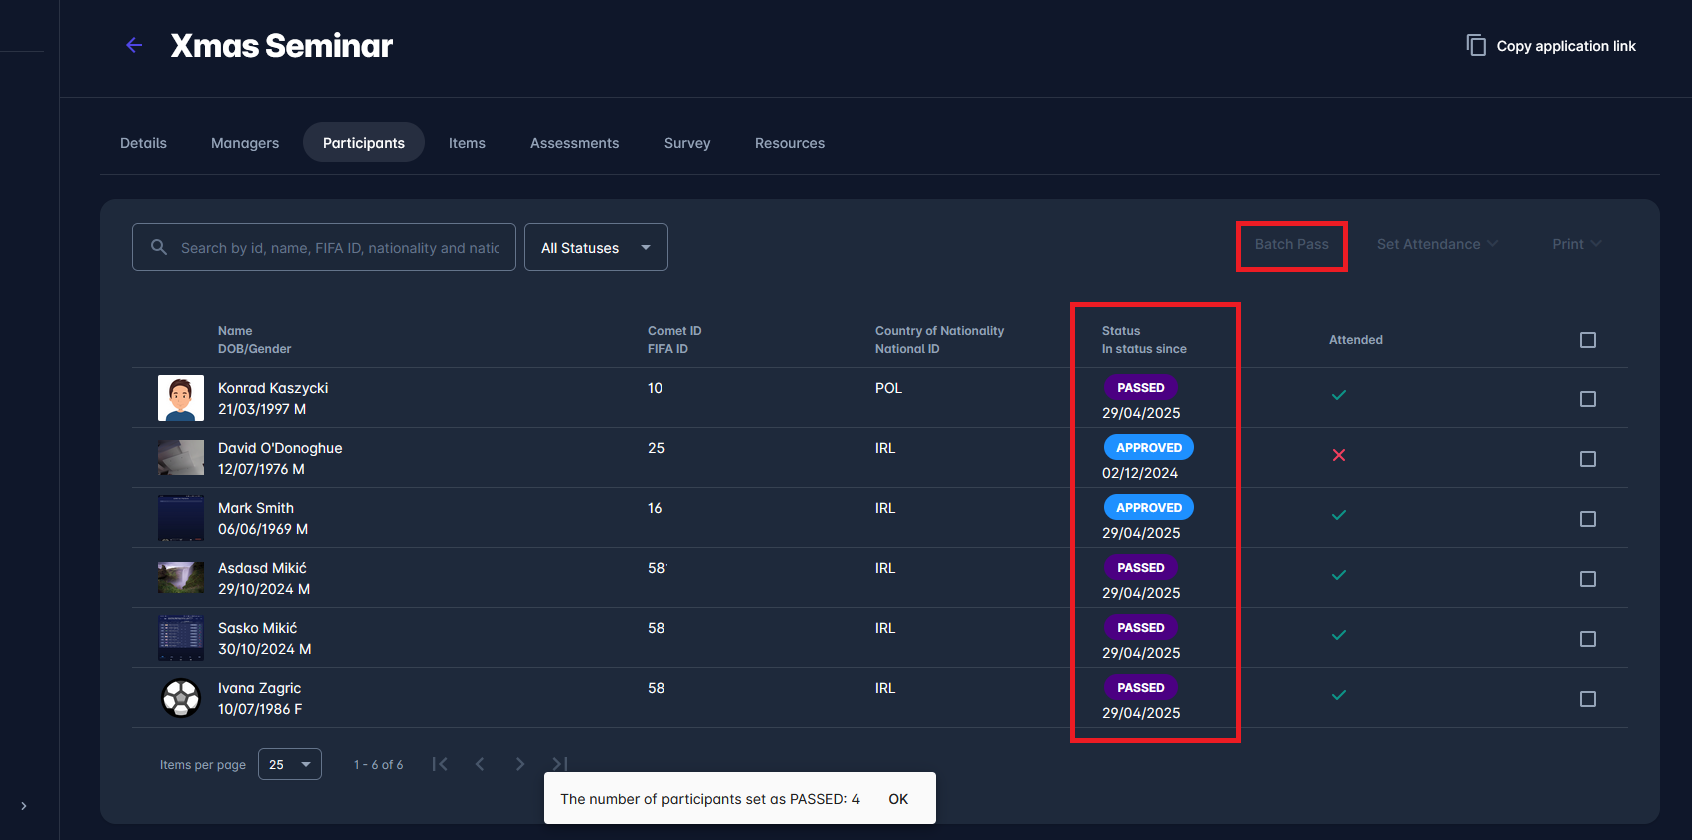
Batch Pass
Batch Pass is a feature that lets you mark all participants who attended the event as Passed. For all Confirmed participants with the Attended flag, this feature will, in one step, change their status, send them a notification, and generate a license (if configured for that Event Type).
This is quite useful in situations where passing an exam is not required to obtain a license. Instead, Attendance can be entered for multiple participants on a single screen (rather than accessing each Participant's profile individually). Then all of them can be marked as Passed in one step.
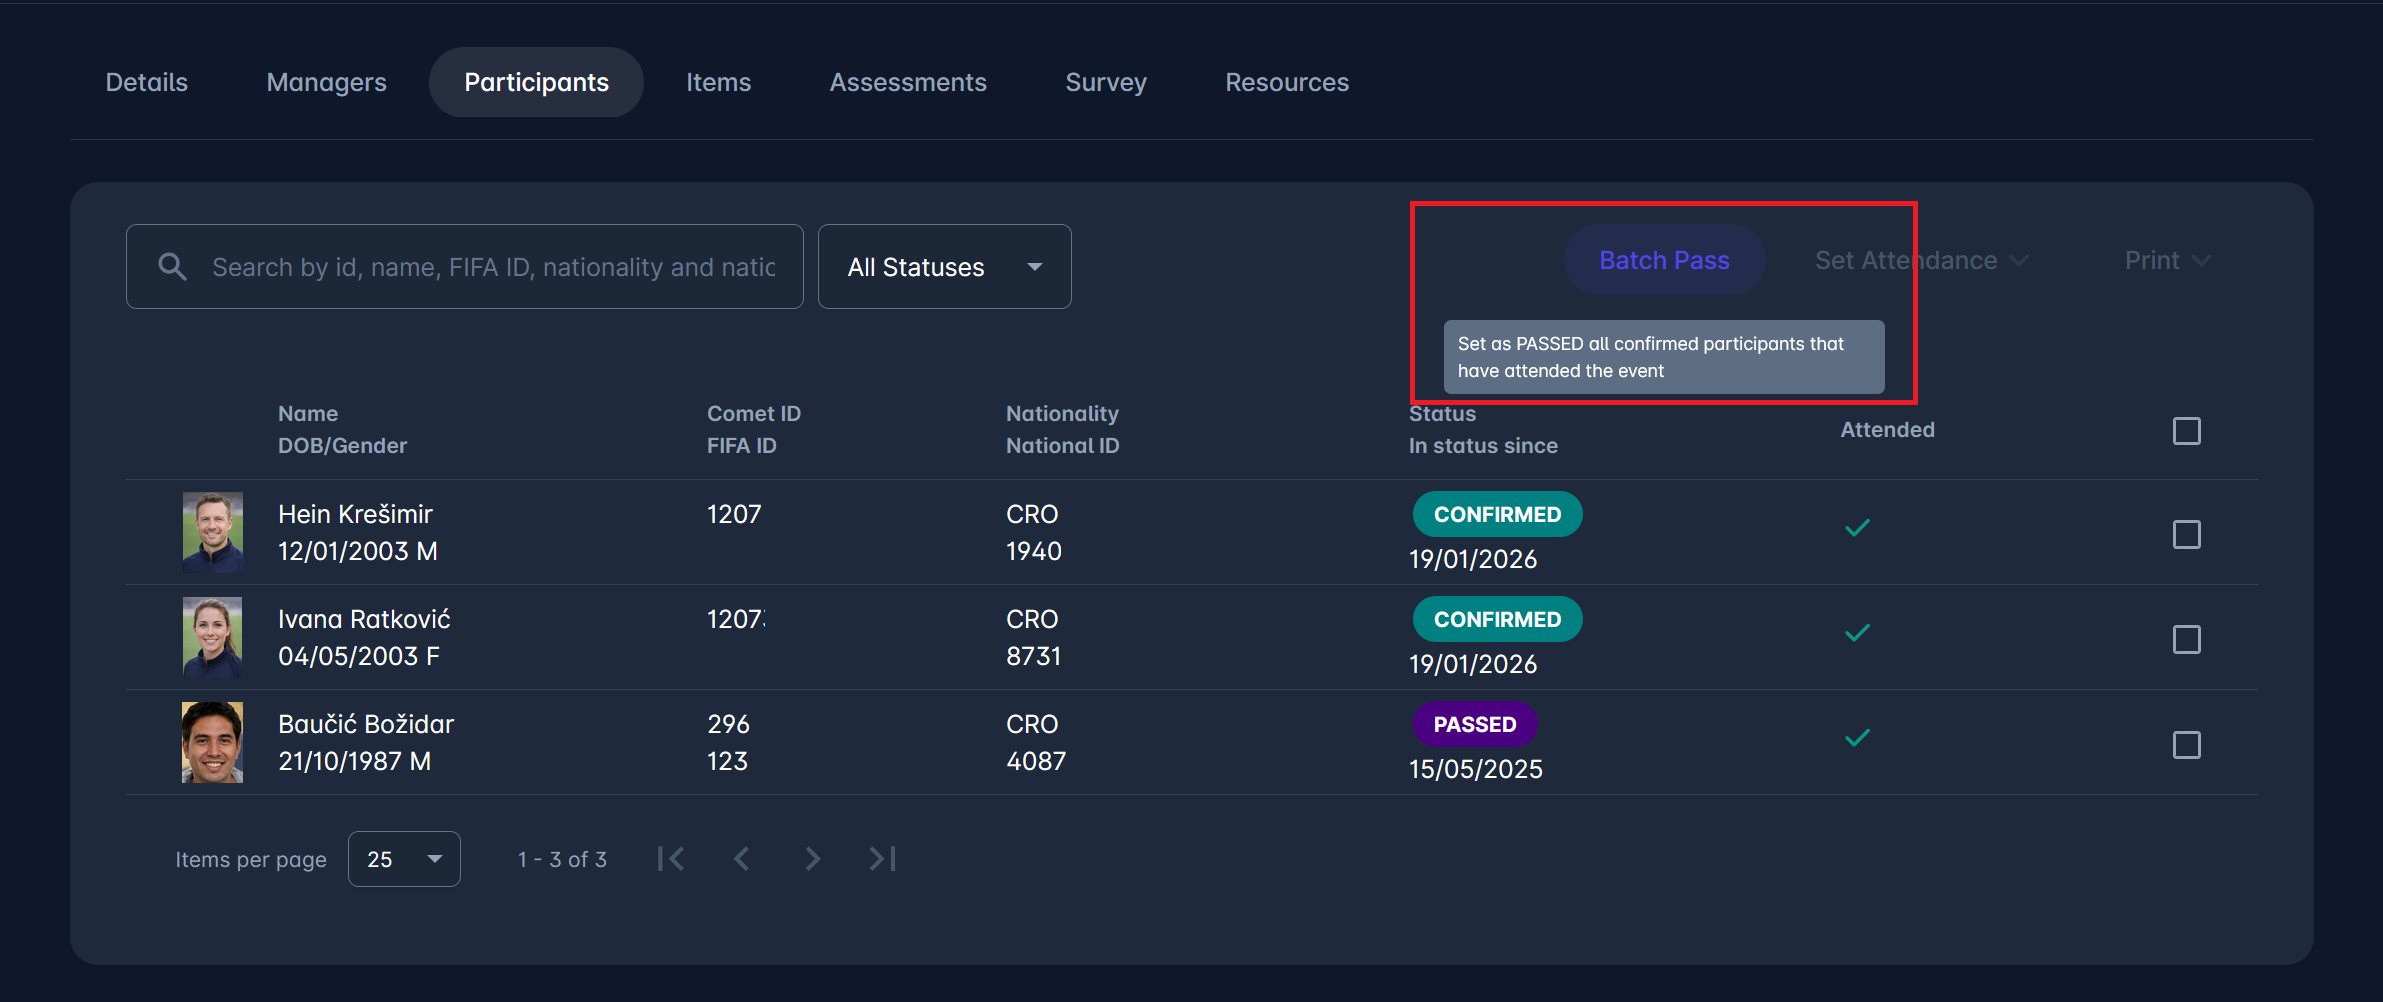
A click on a Batch Pass button opens a dialog that prompts you to confirm the action.
Note that the only attendees set to PASSED are those whose initial status was CONFIRMED and those whose participation has been set to Attended.
In another example, participant David, second on the list, was not automatically set to Passed because he had not been set to have attended the event, and neither was the third participant, Mark, since the initial status was APPROVED, not CONFIRMED.
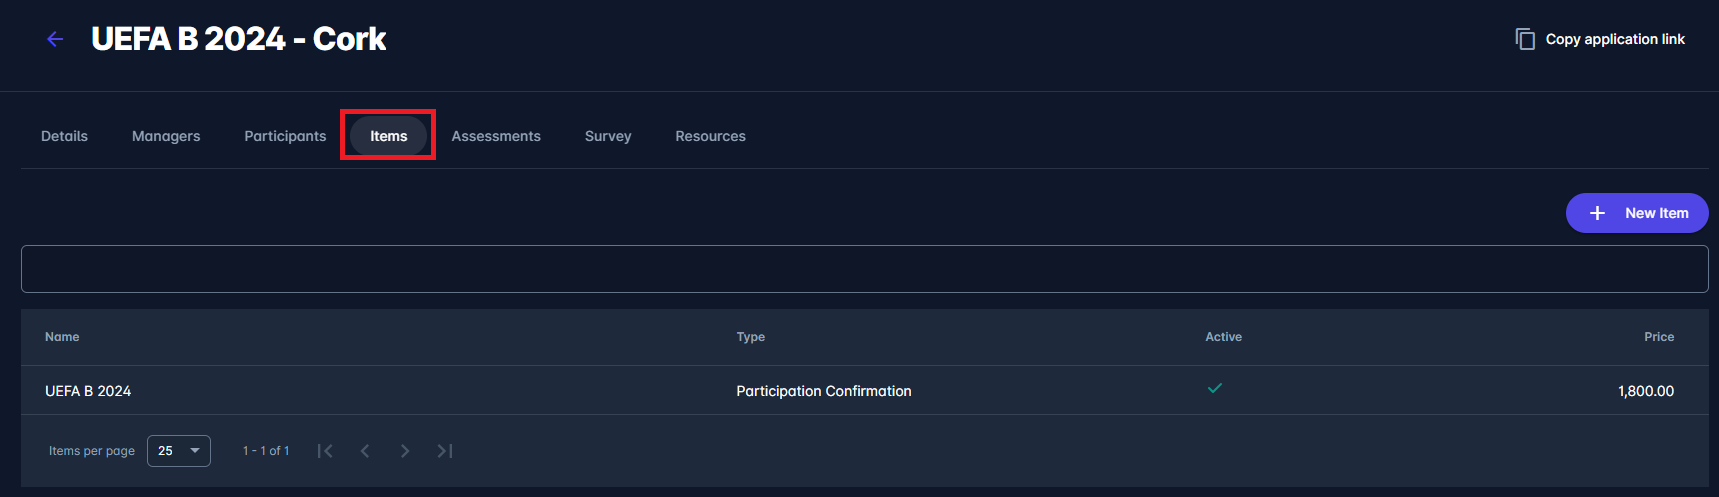
Items Tab
If Pay after approval, Just Pay, or Pay Later is selected as the Application Mode when creating a new event, the Items tab will be displayed on the event profile.
Please check the following link for more instructions on managing the event items from the Item tab: Create Event Item
Assessments Tab
The Assessments tab is displayed on all events regardless of the selected Application type. The Assessments tab lists all event assessments assigned to the event profile.
The list consists of the following details:
-
Name
-
Description
-
Results visibility
-
The search box - use the search box to search through event assessments
Click the ➕ Add button in the top-right corner to add a new assessment directly from the event profile.
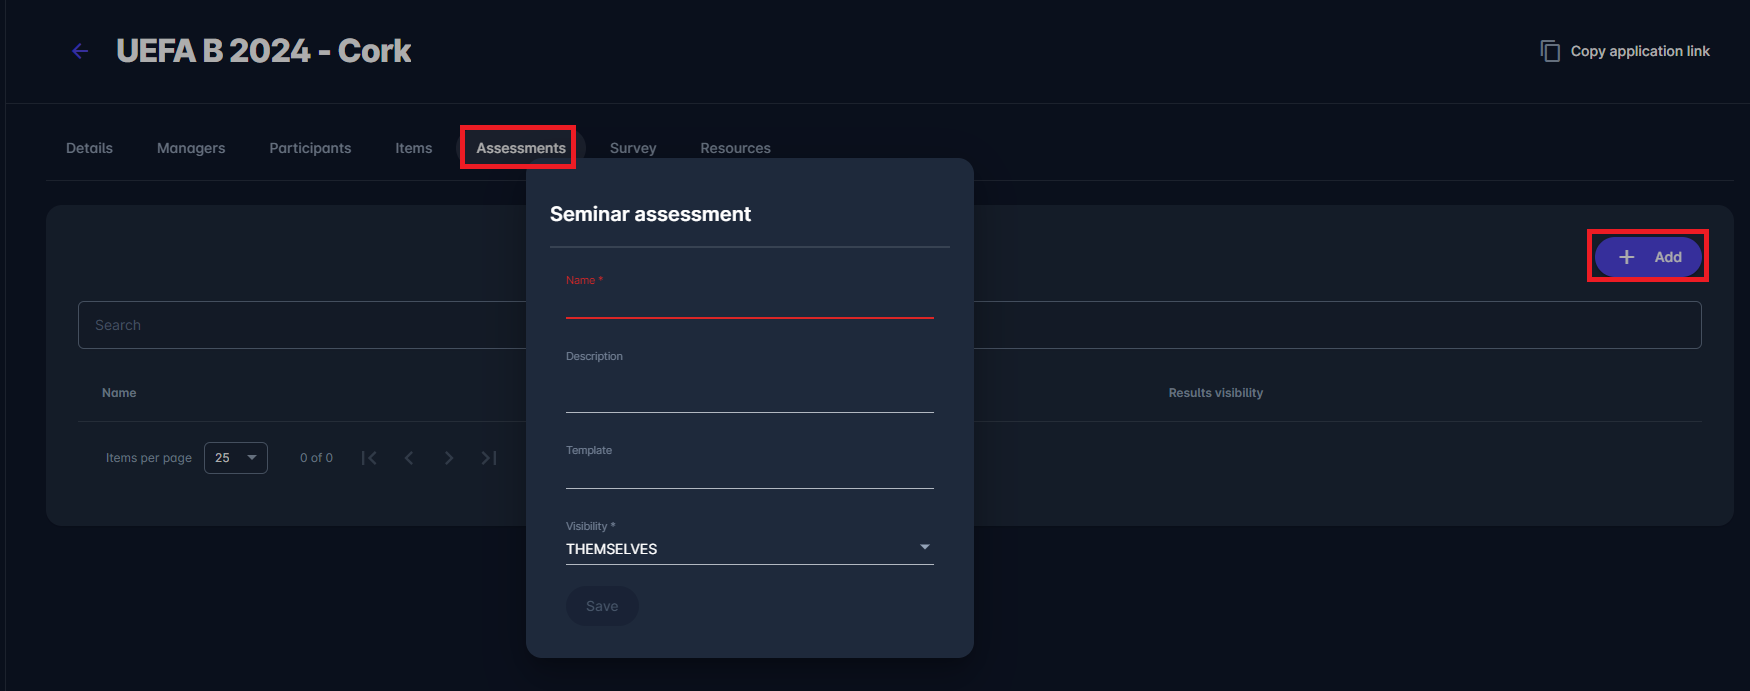
Please check the following link for more instructions on managing the event assessments: Assessments
Survey Tab
If Pay after approval, Just Apply (with Approval), Just Apply (no Approval), or Pay Later is selected as the Application Mode, the Survey tab will be displayed on the event profile.
You can review the survey questions and add a new one on the Survey tab. This feature is used when applicants need to complete a specific survey form (i.e., answer the questions/provide specific info) before purchasing an item.
Click on the Add button in the top right corner to add a new Question’s second panel to edit an existing question. This action opens a question form with the entries to fill/edit the following data fields:
-
Survey question - needs to be selected from the system. Please take into account that all questions need to be defined in the Application Survey Module
-
Position - define the position of the question in the survey form by entering the number input
-
Template group - select the template group if the group is defined in the Application Survey Module
-
Instructions - add instructions; this field is optional
-
Display type - choose between Hint (displayed on mouse-over) and Note (displayed below)
-
Show Label Switch
-
Mandatory Switch - switch on this button if the question is required to submit the form
-
Active/Inactive Switch - inactive questions won't be displayed on the item survey form
On the second tab of the Survey Question Edit page, additional configuration can be done.
Once you have entered all the changes, press 💾 the Save button.
Please check the following link for more instructions on managing the event application surveys: Application Surveys